A question I got a lot after writing this post quite some time ago was “How to pass a processed image from OpenCV back to Unity?!” Obviously, that tutorial described just the way to pass images from Unity to C# (because of the nature of what it needed to do) and my answers in the comments section didn’t quite clarify things for most people, so I thought why not write another tutorial and address all those questions in one go. This article is the result, so I hope it helps you understand not just how images are passed from Unity to OpenCV and vice versa, but also why it needs to be done like this.
First things first, the environment I used for the screenshots and testing the codes I have shared here in this post:
- Windows 10 Pro 64-bit
- Unity 2019.1.4f1 (Installed using Unity Hub 2.0.0)
- Visual Studio 2017 Professional Edition
- OpenCV 4.1.0 for MSVC 2017 x64
A couple of notes before going on. You can adapt this tutorial to any other operating system and development environment if you understand what the differences are between libraries in macOS and Windows and so on, but if you still face issues making it work, you can post your questions in the comments section down below. Another thing you should note, is that you can use any other preferably recent version of OpenCV as well, such as OpenCV 3.4.6 and so on.
Well, to begin, let’s assume we’ll create a simple user interface to view the camera feed and see the results of the OpenCV processed image in real time. Here is how our UI will look like:
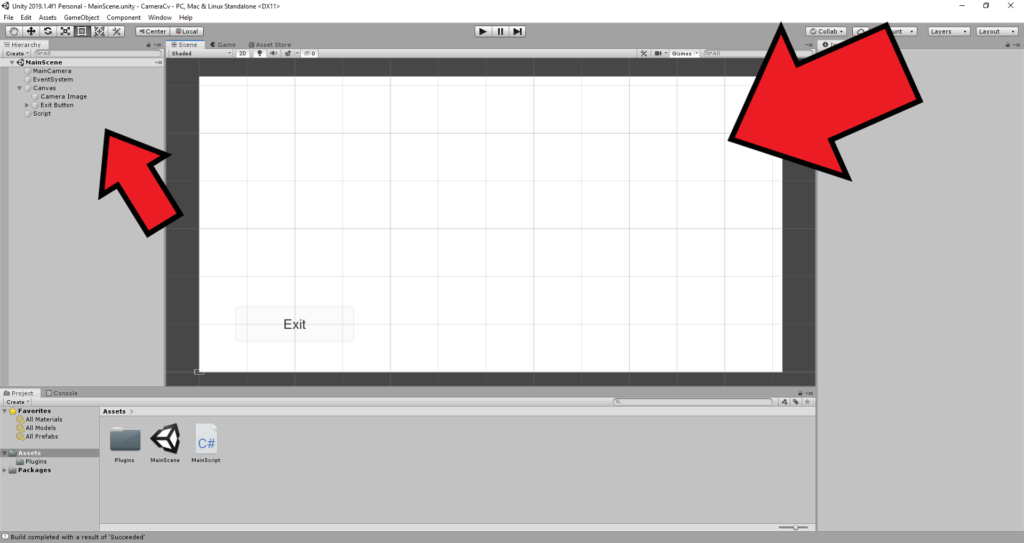
To clarify, we’ll be creating a 2D Unity project with a simple UI seen above. It includes an Image and a Button to exit the application when clicked.
Next, we’ll create a C# Script to bring our UI to life. Let’s assume this Script is called MainScript.cs and it is added to an Empty Component called Script in our UI and initially it’s filled with the following code to handle the Exit Button and other necessary assignments of components in UI to members in our C# class:
using System.Runtime.InteropServices;
using UnityEngine;
using UnityEngine.UI;

public class MainScript : MonoBehaviour
{
    public Image CameraImage;
    public Button ExitButton;

    void Start()
    {
        ExitButton.onClick.AddListener(OnExitButtonClick);
    }

    void Update()
    {
    }

    private void OnExitButtonClick()
    {
        Application.Quit();
    }
}
For the Script to work, you must first assign the Image and Button components as seen in the following picture:
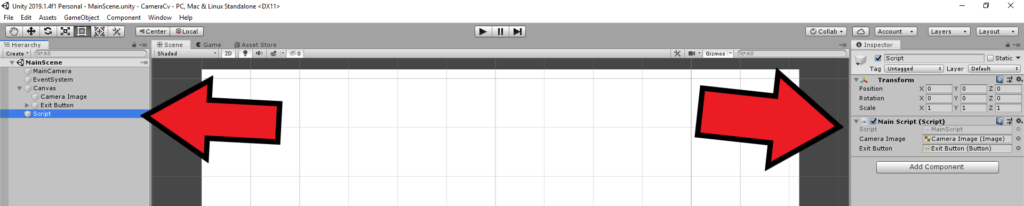
Just drag and drop objects from the Hierarchy panel on the left and into the relevant fields in the Inspector panel, while Script object is selected.
Now we need to use WeCamTexture class in Unity to access live frames read from the camera or webcam in our computer. For this reason we define it as a member in our MainScript class:
private WebCamTexture _webcam;The other class we need is called Texture2D. We’ll use this class to display images modified by OpenCV. SO let’s define that as well as a member of our class:
private Texture2D _cameraTexture;The next and probably the most important thing we need to define in our class is the following:
[DllImport("ComputerVision")]
private static extern void ProcessImage(ref Color32[] rawImage, int width, int height);
This corresponds to the library and function we’ll create in a C++ library that uses OpenCV to process an image read by Unity classes in our C# code. In case you’re interested about the details of the code above, you can read more in this page. The part we need to pay attention to is the first parameter passed to the ProcessImage function:
ref Color32[] rawImageIf you are familiar enough with both C++ and C# languages, you can probably guess what we’re trying to achieve and what will be the corresponding definition for this parameter in our C++ code. But to clarify, we use this to pass a reference to an array of pixels from C# to C++. In other words, we’re trying to pass pixels from C# to C++ but at the same time we want our C++ code to be able to modify the contents of the pixels and consequently pass back pixels from OpenCV and C++ to Unity and C#. In C++, this corresponds to the following:
Color32 **rawImageAgain, if you’re not new to C/C++, you already know that this is a pointer to a pointer of pixel data, or in other words a pointer to an array of pixel data. For more curious C/C++ pros, you’ll see why we must use pointers instead of proper arrays or vectors and references later on.
Back to where we were, we need to initialize the members we defined in our C# code, so let’s modify the start() method of MainScript class to make it look like this:
void Start()
{
    ExitButton.onClick.AddListener(OnExitButtonClick);
    _webcam = new WebCamTexture();
    _webcam.Play();
    _cameraTexture = new Texture2D(_webcam.width, _webcam.height);
    CameraImage.material.mainTexture = _cameraTexture;
}
And update() method needs to look like this:
void Update()
{
    if (_webcam.isPlaying)
    {
        var rawImage = _webcam.GetPixels32();
        ProcessImage(ref rawImage, _webcam.width, _webcam.height);
        _cameraTexture.SetPixels32(rawImage);
        _cameraTexture.Apply();
    }
}
It’s nothing complicated if you are at least armed with the basics. In the start() method, we initialize _webcam and _cameraTexture members of MainScript whereas in update() method we do the following:
- Check if the camera is actually providing frames (isPlaying)
- Read pixels of the current frame read from the camera (GetPixels32)
- Pass the image/pixels from Unity to OpenCV and then from OpenCV back to Unity, since it’s defined as a reference (ProcessImage)
- Display the results (SetPixels32 and Apply)
Now that we have everything we need in our C# code and Unity project, it’s time to create a library and actually write the code responsible for ProcessImage function above.
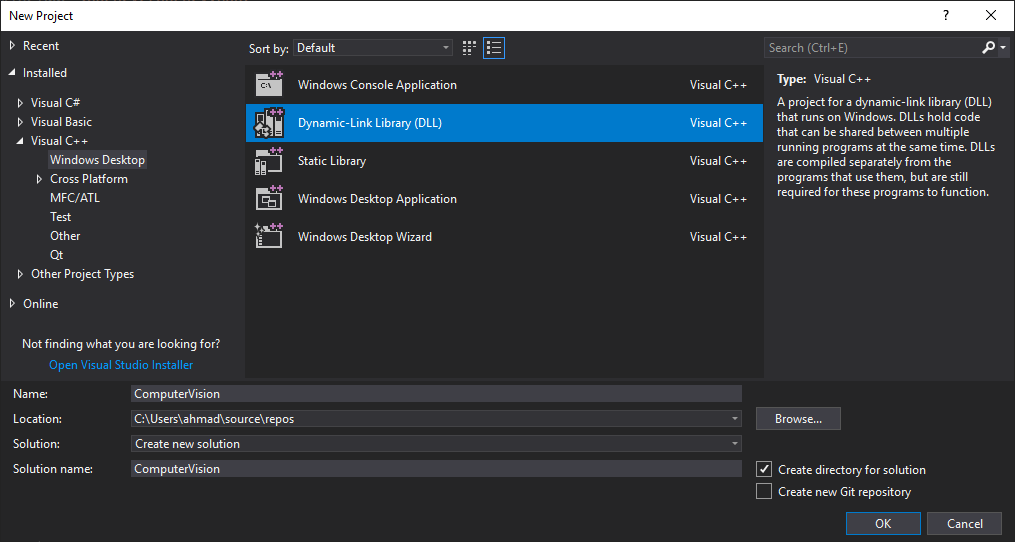
Start by creating Dynamic-Link Library (DLL) project in Visual Studio 2017. Make sure you name it ComputerVision, since that’s the name we used when we defined it using DllImport in MainScript above:
After the project is created, what I’d suggest is to remove all automatically created header and source files and add just a single *.cpp file called ComputerVision.cpp and modify it to look like this:
#include <opencv2/opencv.hpp>

struct Color32
{
	uchar red;
	uchar green;
	uchar blue;
	uchar alpha;
};

extern "C"
{

	__declspec(dllexport) void ProcessImage(Color32 **rawImage, int width, int height)
	{
		using namespace cv;

		// create an opencv object sharing the same data space
		Mat image(height, width, CV_8UC4, *rawImage);

		// start with flip (in both directions) if your image looks inverted
		flip(image, image, -1);

		// start processing the image
		// ************************************************

		Mat edges;
		Canny(image, edges, 50, 200);
		dilate(edges, edges, (5, 5));
		cvtColor(edges, edges, COLOR_GRAY2RGBA);
		normalize(edges, edges, 0, 1, NORM_MINMAX);
		multiply(image, edges, image);

		// end processing the image
		// ************************************************

		// flip again (just vertically) to get the right orientation
		flip(image, image, 0);
	}
}
Notice that we need to first define the Color32 structure as seen below, which corresponds to the type of pixel data Unity provides:
struct Color32
{
	uchar red;
	uchar green;
	uchar blue;
	uchar alpha;
};
In OpenCV this corresponds to CV_8UC4 type, or in other words 32-bit RGBA. The next important piece of code is to wrap all of our functions in extern “C”, as seen here:
extern "C"
{
...
}
The comments I’ve inserted inline should be enough, but again just to further clarify, the following part can be replaced with any other code that modifies the original image:
// start processing the image
// ************************************************

Mat edges;
Canny(image, edges, 50, 200);
dilate(edges, edges, (5, 5));
cvtColor(edges, edges, COLOR_GRAY2RGBA);
normalize(edges, edges, 0, 1, NORM_MINMAX);
multiply(image, edges, image);

// end processing the image
// ************************************************
A couple of other notes if you are facing issues building your library using Visual Studio 2017. Make sure you add OpenCV include paths and lib files to your project, and disable pre-compiled headers if you remove all initial files that were created by Visual Studio. Other than that, if you’re still facing any issues, just post it as a question in comments section below.
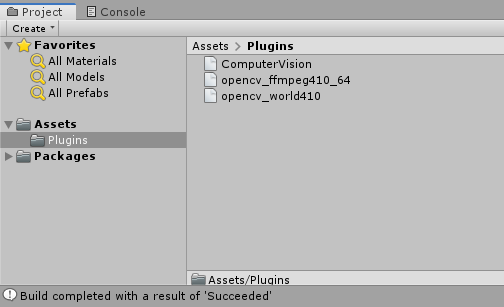
Now build your library and copy the created library file into the Plugins folder in Unity project. Make sure you also copy over any dependencies, such as OpenCV in this case:
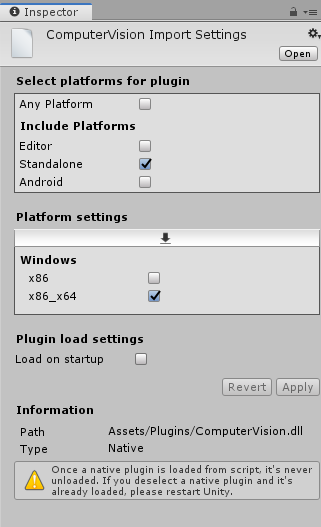
Before running the project in Unity, make sure the libraries are configured correctly by choosing them and setting the required values in Inspector. In my case I used OpenCV 4.1.0 64-bit to build my library, that’s why I used the following configuration:
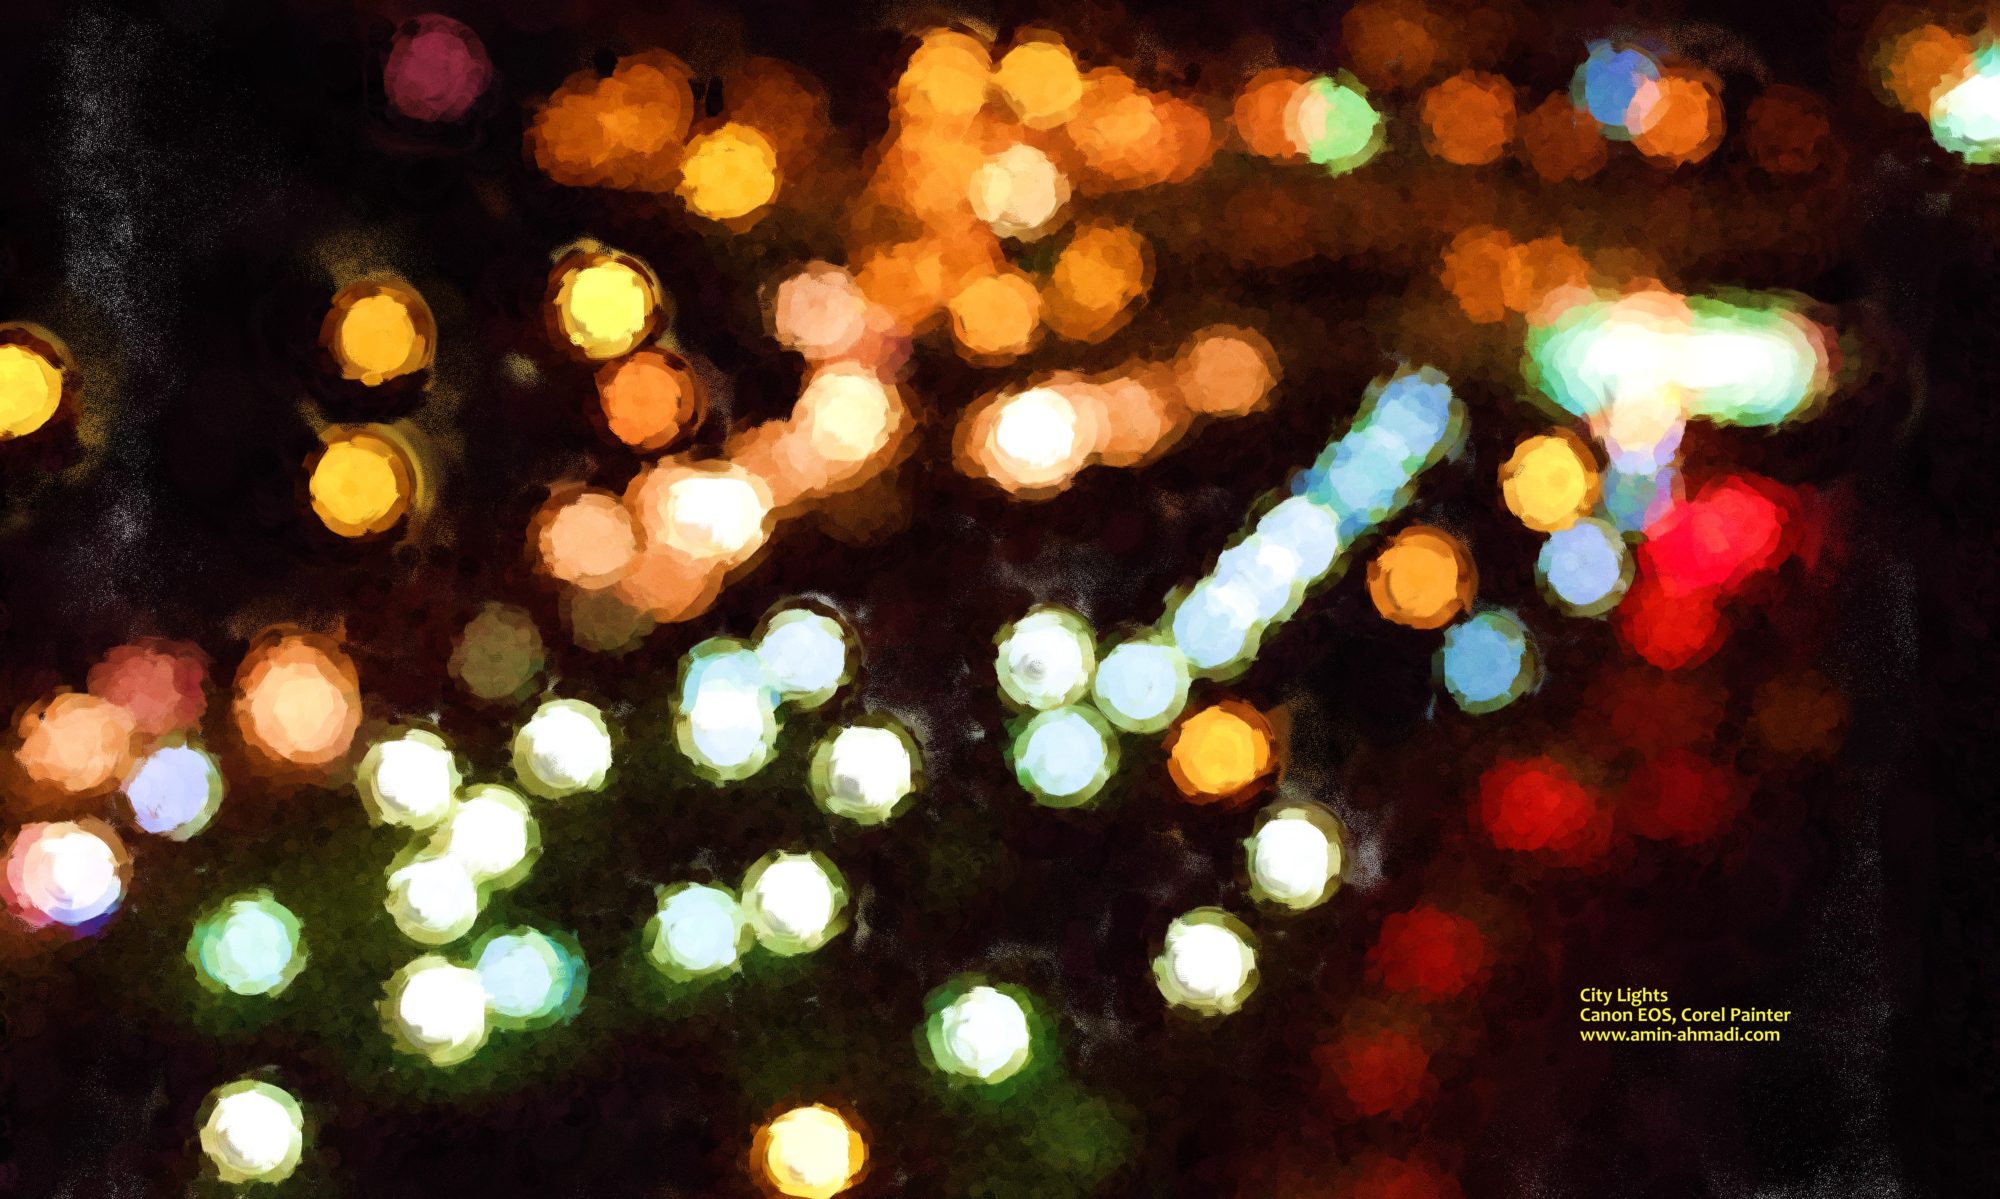
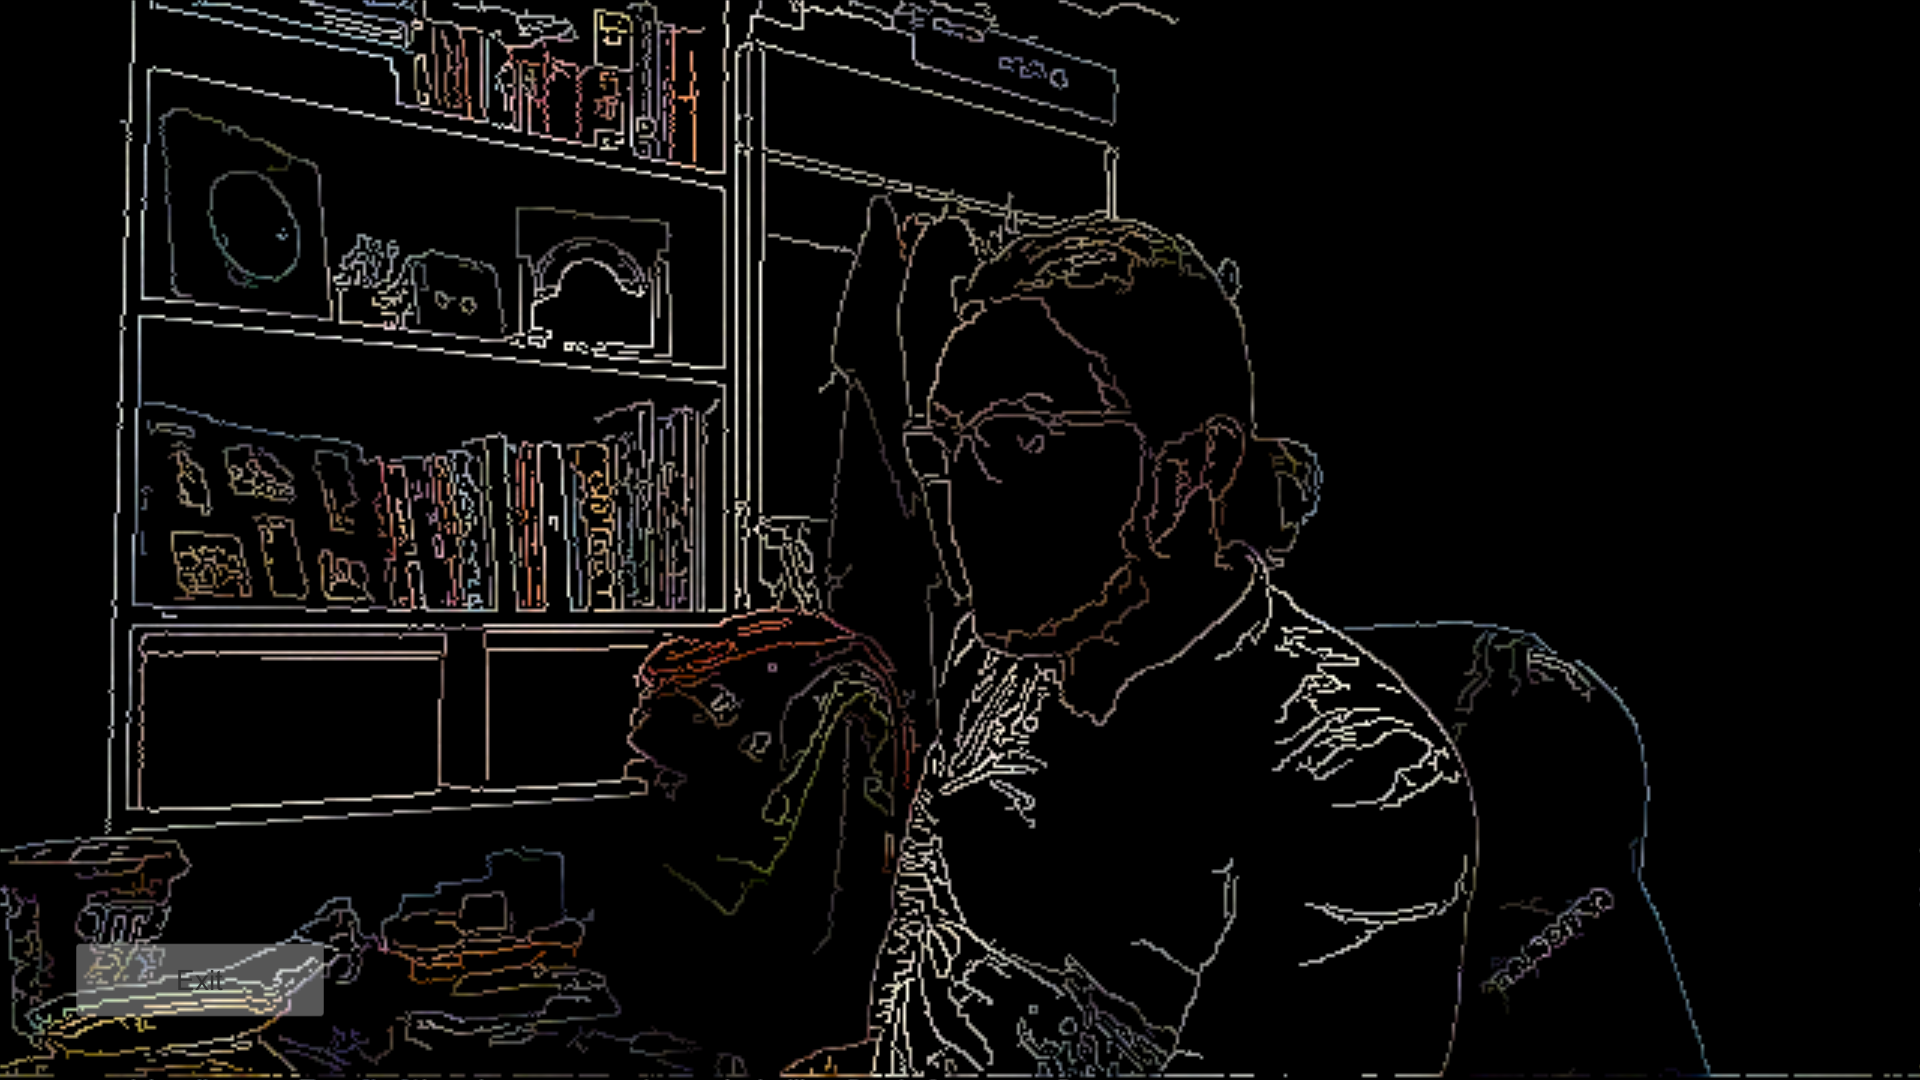
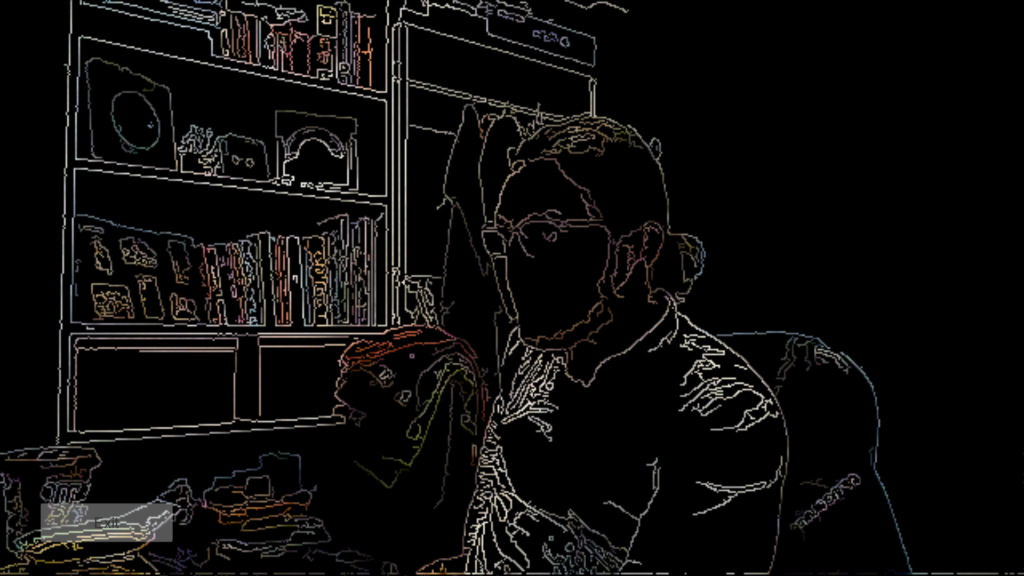
If you haven’t missed anything, you should be able to safely build and run your project now. Below is an screenshot of the project running on my PC showing me in my room with a Canny effect applied to the live images:
I did all what was explained step by step. as well as adding the include paths and lib paths to visual studio. but i get a DllNotFoundException: ComputerVision when unity tries to access the processimage function. in the c# script.
I think i have the dependencies in the plugins folder. I have both what the author has in his.
Did anyone face the same problem and has any tips on how to solve that?
Hi Amin,
i have a related issue and also followed some of your code. The issue is posted on stackoverflow:
https://stackoverflow.com/q/70188444/15147859?sem=2
I think you are one of the guys that could help.
Best regards
Lennart
I’ll have a look
Hi Amin,
i posted a related issue on stackoverflow:
https://stackoverflow.com/q/70188444/15147859?sem=2
you are probably one of the guys that could help.
Best regards
Lennart
So the interesting thing about this is I can combine this with the cascade detection like this, and in theory, it should work with my BGRA AR camera view on my Android OnePlus phone:
—
Mat image(height, width, CV_8UC4, *rawImage);
std::vector faces;
Mat grayscaleFrame;
cvtColor(image, grayscaleFrame, COLOR_BGRA2GRAY);
Mat resizedGray;
resize(grayscaleFrame, resizedGray, Size(image.cols / _scale, image.rows / _scale));
equalizeHist(resizedGray, resizedGray);
_faceCascade.detectMultiScale(resizedGray, faces);
for (size_t i = 0; i < faces.size(); i++)
{
[…]
}
—
However, no images are ever detected, even with the cascade classifier fully initialized and the Pixel32 data clearly being passed with non-empty values. Tried both lbp and haar facial detection with my own face and some pictures — nada. Does anything above jump out as clearly wrong? The OpenCV forums don't seem to have any suggestions. IF I can get this last thing figured out, I have enough material to help with a full on tutorial for android Unity Plugins with OpenCV and Visual C++ that includes present day updates to older techniques that no longer work.
First things first, non empty values doesn’t mean a proper image so that’s not a good test.
Next, you are using BGRA which is not correct, you should be using RGBA instead (red first) this shouldn’t be a huge problem in your case when converting an image to grayscale but still.
Here are a couple of things for you to try:
try to clone the original `Mat image` and see what happens.
try to save that image to disk instead of processing it, you can use imwrite for this, and then go check if it’s formatted properly.
I have a feeling you are passing the data correctly but the format is not what you think it is.
Ah, but the camera feed I’m using is BGRA (and it’s library code from one of our partners that I’m trying to integrate). I can do an extra cvtColor step to see what happens if I convert it to RGBA first, but last time I tried converting it to plain old RGB, then converting that to grayscale, that didn’t work either. Hmm.
Like I said, that’s not a big problem. BGRA or RGBA, conversion to grey shouldn’t fail since they both have 4 channels ending with Alpha channel.
But back to my original point, did you try to use imwrite and save the image to see what it is?
I am trying, but oddly, the image never shows up on my phone. I’m wondering if I need to save it as a certain extension?
Nope, extension shouldn’t be a problem. Just go with JPG or something common like that.
But you have to give access permissions to your app first.
Yeah, it’s still not saving anything, and all my permissions are positive. I have:
—-
extern “C” void ProcessImage(Color32 **rawImage, int width, int height, Circle * outFaces, int maxOutFacesCount, int& outDetectedFacesCount)
{
using namespace cv;
// create an opencv object sharing the same data space
Mat image(height, width, CV_8UC4, *rawImage);
imwrite(“cameraframe.bmp”, image);
std::vector faces;
Mat grayscaleFrame;
Mat rgbFrame;
cvtColor(image, rgbFrame, COLOR_BGRA2RGB);
—-
IF this looks okay from a glance, then I guess I just have to dive in and figure it out.
Also, I get an error:
OpenCV(4.5.3-pre) Error: Assertion failed (total() == 0 || data != NULL) in Mat, file C:\Users\mjpg7\[…]\core\src\matrix.cpp, line 428
when I use this code. Anyone know what this means? I know I’m passing a color32 array from my android camera using AR technology and RGBA, and it’s size is 2073600
Check the data you’re trying to pass. It seems to be either empty or null.
Interesting. So what would we do to feed that into the Detection algorithm that we see in other common tutorials? would we just pass the final frame into DetectMultiScale?
(side note: are Android Cameras naturally one channel? That would explain why I get errors when I try the standard cvtColor(frame, grayscaleFrame, COLOR_RGBA2GRAY); line that comes with most Windows-centered tutorials)
In this case, Unity is (should be) doing the heavy lifting for you and simply giving you RGB so don’t convert anything. Just use what you get.
As for Android, AFAIK it’s usually using NV24 or something similar if you dig to deeper/lower levels in code:
https://wiki.videolan.org/YUV#Semi-planar
Hi, I followed Your both tutorial about OpenCv and Unity. At hte pretty end I find out a problem with I can’t solve. I pass image form C# to OpenCv I recieve it and process. I can display it in pop-out window but can’t return it back to display on the inspector.
I send it by reference like in Your tutorial but lloks like I didn’t recieve any data (final displayed image on my inspector looks unchanged). I post there my miminal code when I tested and tried to fix this issue. I created simply int value passed by reference too with is displayed in console. That one works. Do You have any idea what I’m doing wrong.
C#
public int resWidth = 1920;
public int resHeight = 1080;
public float samplingTime = 0.25f;
public GameObject cam;
public Image CameraImage;
float currentTime;
private Texture2D screenShot;
private RenderTexture rt;
[DllImport(“RunningRobotSimulationOpenCVPart”,CallingConvention = CallingConvention.Cdecl)]
private static extern void processImage(ref Color32[] raw, int width, int height, ref int steering);
void Start()
{
rt = new RenderTexture(resWidth, resHeight, 24, RenderTextureFormat.ARGB32);
screenShot = new Texture2D(resWidth, resHeight, TextureFormat.ARGB32, false);
CameraImage.material.mainTexture = screenShot;
CameraImage.enabled = false;
void Update()
{
CameraImage.enabled = true;
rt = cam.GetComponent().targetTexture;
RenderTexture.active = rt;
screenShot.ReadPixels(new Rect(0, 0, resWidth, resHeight), 0, 0);
Color32[] rawImg = screenShot.GetPixels32();
processImage(ref rawImg, screenShot.width, screenShot.height, ref steering);
screenShot.SetPixels32(rawImg);
screenShot.Apply();
CameraImage.material.mainTexture = screenShot;
Debug.Log(steering);
}
C++
struct Color32
{
uchar red;
uchar green;
uchar blue;
uchar alpha;
};
extern “C”
{
__declspec(dllexport) void processImage(Color32 **raw, int width, int height,int &steering)
{
Mat frame(height, width, CV_8UC4, *raw);
steering++;
Mat img_orginal;
cvtColor(frame, img_orginal, COLOR_BGRA2RGBA);
imshow(“3rd”, img_orginal);
}
As test I wanted only to flip my image. As a result this one in window is flipped and this in inspector not. Value steering works proper and it is incrementing.
Thanks for this tutorial. I got everything working though I’m curious about one thing.
On Windows I normally define and pin pixel32 arrays like this (Unity side):
tex = new Texture2D(640, 480, TextureFormat.RGBA32, false);
pixel32 = tex.GetPixels32();
//Pin pixel32 array
pixelHandle = GCHandle.Alloc(pixel32, GCHandleType.Pinned);
//Get the pinned address
pixelPtr = pixelHandle.AddrOfPinnedObject();
pixelPtr is an IntPtr object and I pass this to the native plugin where it is defined as:
process(unsigned char * input, int width, int height);
However, this doesn’t work in Android, while your method with passing Color32** works. Maybe you have experienced this before, if you have may I ask why the IntPtr method doesn’t work with Android?
My best guess is that with your method the allocated space on Unity side is protected or something.
Have to dig deeper later though.
I am getting the following errors while building the .dll file.
• identifier “Canny” undefined.
• identifier “dilate” undefined.
• identifier “cvtColor” undefined.
• identifier “COLOR_GRAY2RGB” undefined.
This tutorial is tremendously helpful and very niche. I’ve only found another one on the internet that touches upon this topic and yours is more reader-friendly. Thank you.
Nope, its not… so there is Vec3f in between less than and greater than characters
No worries, that’s an issue with the comments section but I see the point in the code.
It lost some characters at std::vector , I hope it will be visible now…
This is what I was trying to do in the .cpp:
#include
using namespace cv;
extern "C"
{
std::vector FindCircles(uchar **rawImage, int width, int height, double dp, double minDist, double param1, double param2, int minRadius, int maxRadius)
{
Mat image(height, width, CV_8UC1, *rawImage);
std::vector circles;
HoughCircles(image, circles, 3, dp, minDist, param1, param2, minRadius, maxRadius);
return circles;
}
}
^This fails to build the way I described in the previous comment, so I modified it to the one below, it builds, but does not seem to work:
#include
using namespace cv;
extern "C"
{
std::vector FindCircles(uchar **rawImage, int width, int height, double dp, double minDist, double param1, double param2, int minRadius, int maxRadius)
{
Mat image(height, width, CV_8UC1);
image.data = *rawImage;
std::vector circles;
HoughCircles(image, circles, 3, dp, minDist, param1, param2, minRadius, maxRadius);
return circles;
}
}
And this is my C# script in Unity to pass the image as byte[]:
    [DllImport("OpenCVOBject")]

    private static extern Vector3[] OpenCVFindCircles(byte[] image, int width, int height, double dp, double minDist, double param1, double param2, int minRadius, int maxRadius);
public Vector3[] FindCircles(byte[] image, int width, int height, double dp, double minDist, double hiThreshold, double lowThreshold, int minRadius, int maxRadius)
{
System.Array.Reverse(image);
Vector3[] circles = OpenCVFindCircles(image, width, height, dp, minDist, hiThreshold, lowThreshold, minRadius, maxRadius);
return circles;
}
Thank you for your aid 🙂
Please pay attention to how the data is passed from Unity to OpenCV:
Mat image(height, width, CV_8UC4, *rawImage);You can’t just copy a 4 channel image (hence the Color32 structure) into a single channel and expect things to somehow work out.
Use the exact code from the tutorial and then try to convert it from CV_8UC4 to CV_8UC1.
I suggest you to try doing the exact same thing as in this tutorial first and see if you’re successful.
If you are, then you can try and convert the 4 channel to single channel using cvtColor or any similar method, and then perform any image processing task you need.
Sorry, I forgot to mention I was trying to pass a *single channel* 8 bit image.
But you are right, I should try to copy your method first, and going jackass only afterwards 🙂
Hi,
I am trying to achieve this for Android library, I have set up the project based on your next article, my SDK is the OpenCV 4.1.0.
Now, whenever I try to define a “Mat” by encoding the byte[] (CV_8UC1 or CV_8UC1) or I try to create that from a given file location, I get build error: identifier “__fp16” is undefinied.
As far as I understand, ARM processors can not work with half precision floats, which Mat seems to be using.
However, for image processing I need to define a Mat (again, as far as I understand). Any idea to resolve this?
Thanks in advance,
Richard
Are you trying to initialize a CV_8UC1 using the image from Unity? (Not sure if I understood your issue correctly)
Anyway, if that’s the case, or something similar to that, then just define a CV_8UC1 and then try to use cvtColor to convert the contents of the Unity image from RGBA to Grayscale and into your CV_8UC1.
Let me know if this helps.
hi,
your tutorial is very usefull, i have a question:
i make Image subtraction with this fuction:
__declspec(dllexport) void ProcessImage(Color32 **rawImage, Color32 **rawBg, int width, int height, float threshold)

	{
// create an opencv object sharing the same data space
Mat currentImage(height, width, CV_8UC4, *rawImage);
Mat backgroundImage(height, width, CV_8UC4, *rawBg);
Mat diffImage;
absdiff(currentImage, backgroundImage, diffImage);
Mat foregroundMask = cv::Mat::zeros(diffImage.rows, diffImage.cols, CV_8UC1);
float dist;
for (int j = 0; j < diffImage.rows; ++j)
{
for (int i = 0; i < diffImage.cols; ++i)
{
cv::Vec3b pix = diffImage.at(j, i);
dist = (pix[0] * pix[0] + pix[1] * pix[1] + pix[2] * pix[2]);
dist = sqrt(dist);
if (dist > threshold)
{
foregroundMask.at(j, i) = 255;
}
}
}
}
how to pass foregroundMask to Unity, can I covert it to CV_8UC4?
I want the mask stored in R channel in Unity. I don’t know what is the texture format in Unity that i can use.
thanks for help.
Regardless of how and what you are trying to do, you can use enum
cv::ColorConversionCodesandCOLOR_GRAY2RGBAin particular to convert a single channel mask image to a 4 channel RGBA image compatible with Unity. Check how cvtColor can be used.You can also share the exact lines of code you’re writing and the line your compiler is complaining about. It would help identifying the issue.