
In this post I will describe the process of of reading, performing any arbitrary image processing algorithm and displaying an image read from a video file, camera or RTSP feed using OpenCV , and the same time keeping the user interface (created using Qt) responsive.
Requirements
In this post, and in this example project, we assume the following to be true before being able to get into the details of how videos are read and displayed responsively:
- You have installed Qt
- You have build and configured OpenCV (see this for more information about this)
- You know the basics of C++ programming language, Qt Framework and how to use Qt Creator
How-To
Start by creating a Qt Widgets Application project using Qt Creator. When the project is created, you need to first add OpenCV libraries to your Qt project. See this post for more information. (You can also see this post to learn how you can use OpenCV with a Qt project that uses CMake build system)
Designing the User Interface
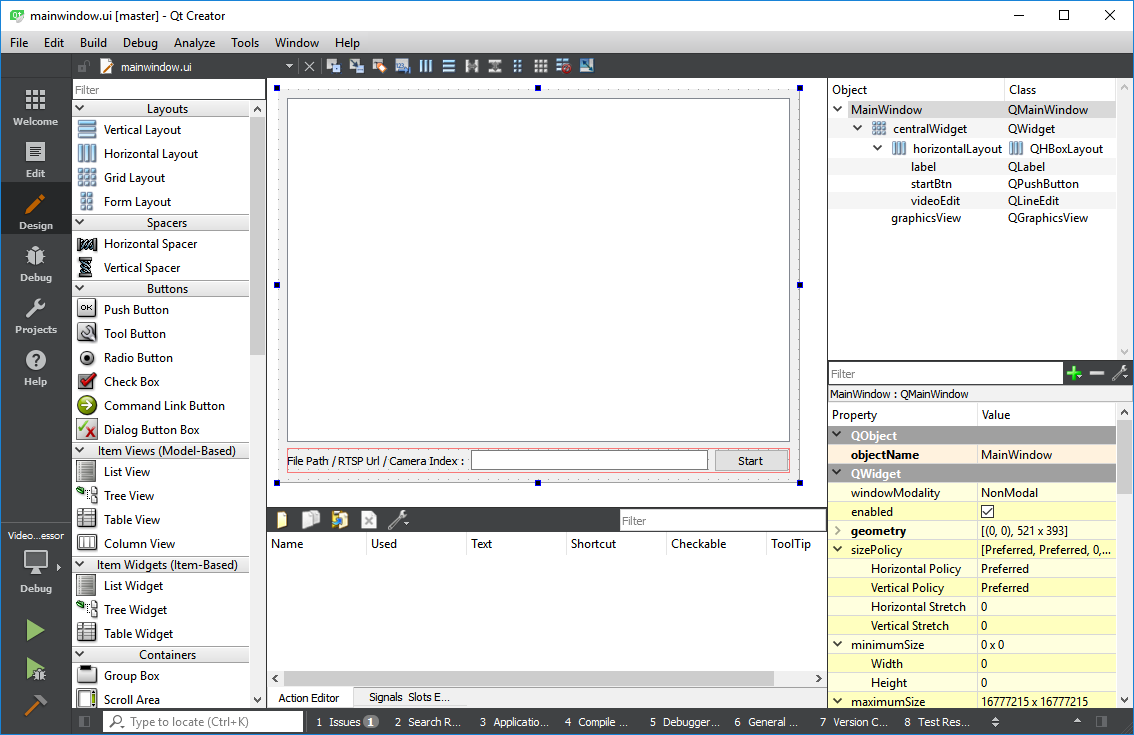
We’re going to use a QGraphicsView widget to display the video frames read using OpenCV VideoCapture class. We’ll also use a QLineEdit widget to get the user entered camera index, file path or RTSP feed URL. Here’s a screenshot of the simple design of our user interface:
Required Includes and Definitions
In the mainwindow.h file we need the following #include directives:
#include <QMainWindow>
#include <QDebug>
#include <QGraphicsScene>
#include <QGraphicsPixmapItem>
#include <QImage>
#include <QPixmap>
#include <QCloseEvent>
#include <QMessageBox>

#include "opencv2/opencv.hpp"
Besides that we need the following protected and private entries added to our MainWindow class:
We’ll be using closeEvent to prevent closing the user interface before stopping the video.
Preparing The Graphics Viewer
To initialize the QGraphicsView you just need the following in MainWindow constructor:
ui->graphicsView->setScene(new QGraphicsScene(this));
ui->graphicsView->scene()->addItem(&pixmap);
Prevent Closing the Window
While the video is being read and processed, or the camera is being accessed, you need to make sure MainWindow can’t be closed. You can do this using the following:
void MainWindow::closeEvent(QCloseEvent* event)
{
	if (video.isOpened())
	{
		QMessageBox::warning(this,
			"Warning",
			"Stop the video before closing the application!");
		event->ignore();
	}
	else
	{
		event->accept();
	}
}
In general, if you want to prevent closing a Qt window you have to override closeEvent as seen in the preceding code, and accept() or ignore() the event based on a condition.
Opening the Video or Camera
To be able to choose between camera or video file or RTSP feed URL, we try the entered text into the QLineEdit field. The we simply use the open() function of VideoCapture class as seen here:
using namespace cv;
bool isCamera;
int cameraIndex = ui->videoEdit->text().toInt(&isCamera);
if (isCamera)
{
	if (!video.open(cameraIndex))
	{
		QMessageBox::critical(this,
			"Camera Error",
			"Make sure you entered a correct camera index,"
			"<br>or that the camera is not being accessed by another program!");
		return;
	}
}
else
{
	if (!video.open(ui->videoEdit->text().trimmed().toStdString()))
	{
		QMessageBox::critical(this,
			"Video Error",
			"Make sure you entered a correct and supported video file path,"
			"<br>or a correct RTSP feed URL!");
		return;
	}
}
Obviously we display relevant messages using QMessageBox in case of a wrong camera index, unsupported file or a RTSP feed URL that doesn’t work.
Reading and Processing Frames
Reading video frames using OpenCV’s VideoCapture class is quite simple. The trick here is that you need to put in qApp->processEvents() into each iteration of your loop to make sure the GUI thread and other events are processed, otherwise you video will be stuck, your screen will not be refreshed with new frames and most probably you’ll need to crash your app to be able to stop or quit it.
Mat frame;
while (video.isOpened())
{
	video >> frame;
	if (!frame.empty())
	{
		// process and display frames
	}
	qApp->processEvents();
}
This is basically the most simple way of making sure your user interface is responsive while you read and process video frames. For more tutorials about this topic, and especially to learn how this is done using QThread classes and proper multi-threading, you can refer to my book Computer Vision with OpenCV 3 and Qt5, which also contains tons of examples to boost your Qt and OpenCV skills.
Displaying Video Frames (and Images)
To be able to properly display OpenCV Mat images on a Qt QGraphicsView, you need to perform the following:
- Convert Mat to QImage (This obviously means convert OpenCV Mat class to Qt QImage class)
- Since default OpenCV color space is BGR (Blue-Green-Red), you need to swap Red and Blue channels so that it’s a standards RGB image. (Miss this and you’ll get all funny colors 🙂 )
- Convert QImage to QPixmap (image to pixmap)
- Create a QGraphicsPixmapItem using the QPixmap (create an item using the pixmap)
- Add the QGraphicsPixmapItem to the QGraphicsScene of the view (set the item to the scene of the view)
All of what we said might seem too much, but in fact you can get them all done using a couple lines of code, as seen here:
QImage qimg(frame.data, frame.cols, frame.rows, frame.step, QImage::Format_RGB888);
pixmap.setPixmap( QPixmap::fromImage(qimg.rgbSwapped()) );
Using Format_RGB888 ensures that image data is converted as it is supposed to, and rgbSwapped() takes care of swapping the Blue and Red channels in a QImage.
Note that the item was added to the scene at the initialization, remember the following in MainWindow constructor:
ui->graphicsView->scene()->addItem(&pixmap);Optionally you can use the following to make sure the image always fits the view no matter the window size of your application:
ui->graphicsView->fitInView(&pixmap, Qt::KeepAspectRatio);Note that you can replace KeepAspectRatio with any of the following to change how your images and video frames are resize to fit the view:
- IgnoreAspectRatio
- KeepAspectRatio
- KeepAspectRatioByExpanding
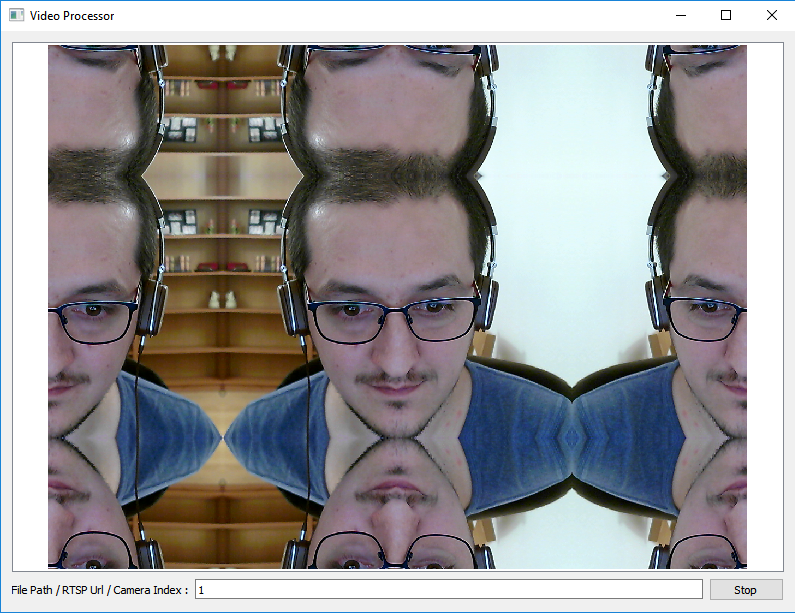
Here is a screenshot depicting how the final application looks like, when performing a simple copyMakeBorder process. Obviously you can replace the image processing code with anything you like:

You can get the complete source codes of the example project from this Bitbucket repository. You can ask your questions using the Comments section below.
I cloned the repo and tried to run using qmake -project, qmake, amke. When i enter make i recieve a error fatal error: QMainWindow: No such file or directory. Any idea how to fix it??
Did you try with Qt Creator? You have a build issue obviously but I can’t seem to pinpoint the source of the problem. qmainwindow.h and cpp are definitely in the repo.
Hello,
Thanks for the tutorial.
My interface get stuck when I loose the connection with the rtsp stream. It is a known issue but I didn’t found a proper way to solve it . Do you have any idea ?
https://answers.opencv.org/question/93430/videocapture-suddenly-blocks-on-reading-a-frame-from-ip-camera/
Best regards !
I haven’t faced this issue myself and to be honest I don’t have any “proper” solutions to it, by my own standards.
In any case, as a suggestion and as a workaround, to avoid such issues what I might do is that I would grab frames and process them in a separate thread and end that thread if it goes idle.
Implementing the idle thread detection is up to yourself.
For instance you can reset an idle timer every time a frame is processed. If the timer times out, kill the thread or end it nicely 😉
How do I play a video file? can you show an example screen shot? do I need to give a full path of the video?
Just read through this post from scratch and I’m sure you’ll find the answer you’re looking for.
I tried to use and run this method on another thread but it is VERY slow here what I am doing to run stuff on separate thread:
I probably better of using QT interface to communicate with camera.
Thanks for sharing
void MainWindow::on_startButton_clicked()
{
cout << "on_pushButton_clicked" <graphicsView->setScene(new QGraphicsScene(this));
ui->graphicsView->scene()->addItem(&pixmap);
ui->graphicsView->fitInView(&pixmap, Qt::KeepAspectRatio);
video.open(0);
thread = new QThread(this);
timer = new QTimer();
//Creating instance of Engine worker
worker = new CaptureProcessVideoThread();
worker->setVideoPixma(&video, &pixmap);
worker->setSnapshotFolder(“/home/mike/Pictures”);
worker->setCaptureListWidget(ui->captureListWidget);
worker->setGraphicsView(ui->graphicsView);
timer->setInterval(1000);
//Connecting Engine worker’ foo slot to timer
connect(timer, &QTimer::timeout, worker, &CaptureProcessVideoThread::run);
connect(thread, &QThread::started, timer, static_cast(&QTimer::start));
timer->moveToThread(thread);
thread->start();
}
Thank you it’s working, the index wasn’t the right one.
Hello Amin,
Thank you for this very explicit tutorial, the code was compiled but in the graphicsView, the screen is blanc. i wanted to read the webcam of my laptop.
Can you give a hand please, it’s for my school project.
Thanks in advance.
Try setting the camera index correctly, perhaps to zero if it’s the default camera on your computer.
Also check if you get the following error:
“Make sure you entered a correct camera index”
I’ve noticed that in different articles you used different methods to access video feed. Here you use OpenCV VideoCapture. In other articles you used Qt QCamera and/or QML. What are the pros and cons of each approach on mobile? (VideoCapture vs QCamera vs QML vs QWidget)
I’m mostly interested in low latency and high fps (100 fps) video input processing on mobile devices (iOS, Android). QCamera seems to have more options (adjusting focus, iso, shutter time, etc.) than Video Capture however when tested QML Camera official example from Qt there was just 20fps without any processing (or maybe example is outdated) using build-in laptop webcam.
Would be great if you could update the samples to the latest Qt5.11 or Qt.512 and opencv 4.0 – I have experienced lots of compile errors and as a Qt beginner it’s hard to follow.
VideoCapture class of OpenCV is often easier to use (n terms of the number of lines of code) but there are certain cases where it doesn’t work, at least not yet. For instance, VideoCapture of OpenCV doesn’t support mobile operating systems as good as QCamera class in Qt. However, VideoCapture provides you with Mat objects which you can directly use with most OpenCV algorithms whereas you need a bit of conversion before you can use frames grabbed by QCamera in OpenCV algorithms. I hope this is clear enough. One benefit of VideoCapture would be its extremely easy to use RTSP support but that is again a matter of simplification which is the case with VideoCapture in general.
In terms of speed, although it depends on a large number of parameters including the processor power, and especially with Android and iOS, QCamera definitely has better support but the amount of low-level copying and converting of data is so much that it is usually slow.
I’m afraid converting of all examples on my website or books to OpenCV 4.0 won’t be possible anytime soon, but I will try to write an article describing how to migrate from OpenCV 3.x to 4.x. Hope my answers helped.
May I know how much fps you get for this? Thanks
The answer to your question hugely depends on my personal computer but what I can tell you is that for a simple process like this you can get extremely high frame rates even with a “regular” PC.
Again my definition of “regular” might be different than yours, so, to give you an idea, let’s say at least an Intel i3 CPU and 4GBs of RAM and so on are my definition of regular (but an absolute minimum)
Amin , i tryed this but it doesnt work .. :s
————————————————-
connect(ui->horizontalSlider, SIGNAL(valueChanged(int)), SLOT(setValue(int)));
connect(ui->horizontalSlider2, SIGNAL(valueChanged(int)), ,SLOT(setValue(int)));
——————————————————–
if (ui->medianblur->isChecked())
{
cvtColor(src, img, COLOR_RGB2GRAY);
threshold(img, img, ui->horizontalSlider->value(), ui->horizontalSlider2->value(), THRESH_BINARY_INV);
ui->imglabelout->setPixmap(QPixmap::fromImage(QImage(img.data, img.cols, img.rows, img.step, QImage::Format_Grayscale8).scaled(ui->imglabelout->size(), Qt::IgnoreAspectRatio)));
}
You need to take a good look at this page:
http://doc.qt.io/qt-5/signalsandslots.html
I can also refer you to my book, “Computer Vision with OpenCV 3 and Qt5”, here’s a link:
https://www.amazon.de/Computer-Vision-OpenCV-multithreaded-cross-platform/dp/178847239X
You need to get a solid understanding of what signals and slots in Qt are.
There’s no way I can describe it better than what is already in those links.
I hope this helps.
hi amin
how can i use Slider for my thresholding ?
for example threshold(img,img, 0 , 255,thresh_binary)
Good question amine,
You can add one (or more) QSlider widgets to the user interface and replaced integer values with the slider value.
Something like this:
threshold(img, img, ui->threshSlider->value(), ui->maxSlider->value(), …
If the threshold function above is in a loop reading frames (as in the example of this post), then there’s nothing else needed.
Otherwise you need to create a slot to take care of valueChanged signal.
Hi amin thank you for helping , im using this code but it doesnt work , so how to create a slot for this case (i’m not using loop reading framework -iam beginner in qt) ?
————————————————————————————————————————
if (ui->medianblur->isChecked())
{
cvtColor(src, img, COLOR_RGB2GRAY);
threshold(img, img, ui->horizontalSlider->value(), ui->horizontalSlider2->value(), THRESH_BINARY_INV);
ui->imglabelout->setPixmap(QPixmap::fromImage(QImage(img.data, img.cols, img.rows, img.step, QImage::Format_Grayscale8).scaled(ui->imglabelout->size(), Qt::IgnoreAspectRatio)));
}
————————————————————————————————————————
I want to fit my image to the size of Qlabel
where can i put the Qt::Keepaspectratio ?
using namespace cv;
Mat src;
src = imread(ui->lineEditdir->text().toStdString());
cvtColor(src, src, COLOR_BGR2RGB);
ui->imglabel->setPixmap(QPixmap::fromImage(QImage(src.data, src.cols, src.rows, src.step, QImage::Format_RGB888)));
Assuming your QLabel object is called “label”, you can use something like the following:
ui->imglabel->setPixmap(QPixmap::fromImage(QImage(src.data, src.cols, src.rows, src.step, QImage::Format_RGB888).scaled(label->width(), label->height(), Qt::KeepAspectRatio)));
Also you can provide an additional parameter to the scaled function to set the transformation mode. Here’s a link:
http://doc.qt.io/qt-5/qt.html#TransformationMode-enum