
[Updated this post on April 04, 2019, to make sure this tutorial is compatible with OpenCV 4.x and TensorFlow 2.0]
In this post we’re going to learn how to create an image classifier application with a proper GUI that allows the users to choose a camera or a video file as the input and classify the incoming images (video or camera frames) in real time. We’ll be using the power of Qt for cross-platform GUI creation and anything related to visualizing the output and allowing a seamless experience for the user. We’ll also be using TensorFlow and OpenCV to handle the actual classification task, along with accessing cameras and video files.
With the more recent versions of OpenCV, a new module was introduced for handling Deep Learning problems, which is getting better and better by each release. This module is called “dnn” and I recommend getting the latest version of OpenCV (3.4.1 at the time of writing this article) to make sure you face no issues at all (or less issues if any). Using this new module, we can load and use deep learning models from popular 3rd party libraries such as TensorFlow, Caffe, DarkNet and so on. In our example project we’ll use pre-trained TensorFlow models, namely ssd_mobilenet_v1_coco, however, you can easily use other models too if you get a firm grasp on all of the information provided here.
Prerequisites
We’ll be performing everything described here in Windows operating system, so we’ll cover the prerequisites for Windows. On other operating systems such as macOS or Linux though, the only major change is the compiler which is either provided as part of Xcode or GCC. So, here is what you need on Windows:
• Microsoft Visual Studio 2017 (https://www.visualstudio.com)
• Qt5 (https://www.qt.io)
• OpenCV 3 (https://opencv.org)
• CMake (https://cmake.org)
• Python 64-bit (https://www.python.org)
• TensorFlow (https://www.tensorflow.org)
Make sure to install the latest version of all dependencies mentioned here. At the time of writing this article, it would be Qt5.10.1, OpenCV 3.4.1, CMake 3.10.2, Python 3.6.4 and TensorFlow 1.6.
[Update April 04, 2019: Qt5.12.2, OpenCV 4.0.1 and TensorFlow 2.0 will also work, as long as you take into account the updated notes such as this one, throughout this tutorial.]
If your OpenCV installation does not contain 64-bit MSVC 15 libraries, then you need to build them from source by yourself. You search my website for detailed guides on how to do just that! You can continue reading if you have all dependencies in place.
Creating a Qt GUI Project That Uses CMake
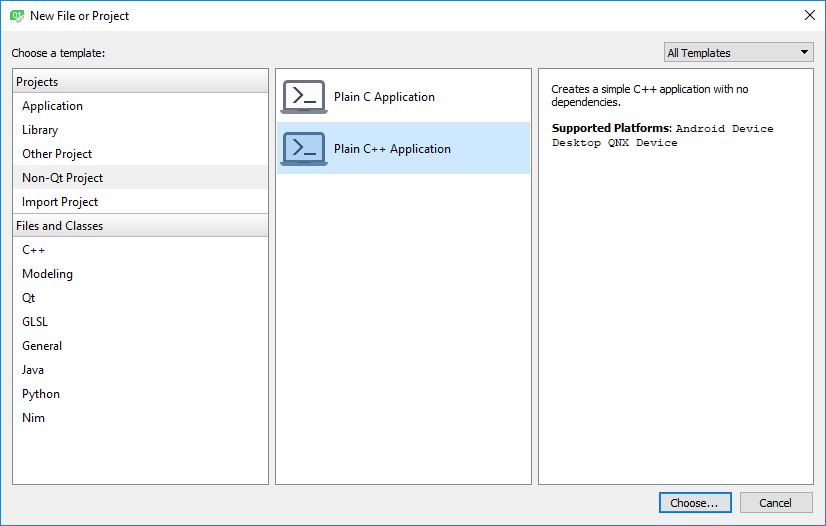
We are going to create a Qt GUI application project that uses CMake. This is a good point to learn about this if you have never used CMake with Qt Creator before. It will also allow a lot easier integration of OpenCV libraries into our Qt project. So, start by creating a new project as seen in the next screenshot (Choose Plain C++ Application):
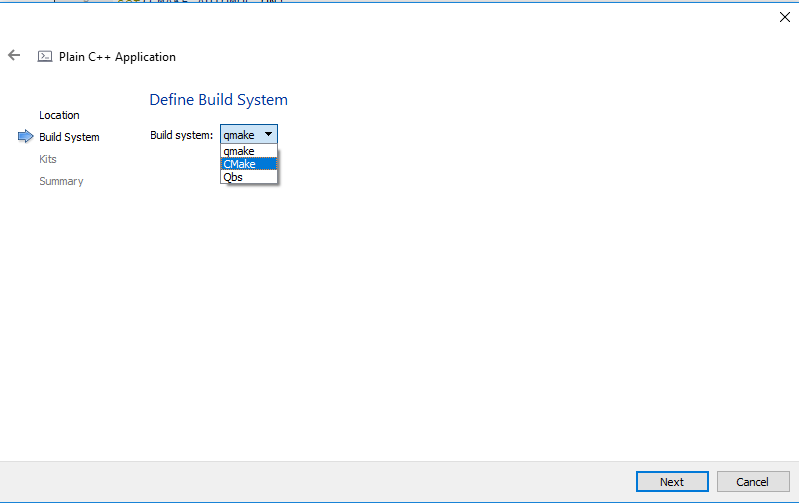
Press “Choose” and on the next screen make sure to name your project “Image Classifier” (or anything else you prefer). Also choose CMake and the “Build System” in the next screen:
After the project is created, replace all of the contents of CMakeLists.txt file with the following (the comments in the following code are meant as a description to why each line exists at all):
# Specify the minimum version of CMake(3.1 is currently recommended by Qt)
cmake_minimum_required(VERSION 3.1)

# Specify project title
project(ImageClassifier)

# To automatically run MOC when building(Meta Object Compiler)
set(CMAKE_AUTOMOC ON)

# To automatically run UIC when building(User Interface Compiler)
set(CMAKE_AUTOUIC ON)

# To automatically run RCC when building(Resource Compiler)
set(CMAKE_AUTORCC ON)

# Specify OpenCV folder, and take care of dependenciesand includes
set(OpenCV_DIR "path_to_opencv")
find_package(OpenCV REQUIRED)
include_directories(${ OpenCV_INCLUDE_DIRS })

# Take care of Qt dependencies
find_package(Qt5 COMPONENTS Core Gui Widgets REQUIRED)

# add required source, header, uiand resource files
add_executable(${ PROJECT_NAME } "main.cpp" "mainwindow.h" "mainwindow.cpp" "mainwindow.ui")

# link required libs
target_link_libraries(${PROJECT_NAME} Qt5::Core Qt5::Gui Qt5::Widgets ${OpenCV_LIBS})
You can also download the final CMakeLists.txt file from here:
http://amin-ahmadi.com/downloadfiles/qt-opencv-tensorflow/CMakeLists.txt
Just make sure to replace “path_to_opencv” with the actual path to your OpenCV installation. That would be the folder where “OpenCVConfig.cmake” and “OpenCVConfig-version.cmake” files exist. Don’t worry about the mainwindow entries as they will be added later on.
Next, replace all of the contents of “main.cpp” with the following:
#include "mainwindow.h"
#include <QApplication>
int main(int argc, char* argv[])
{
QApplication a(argc, argv);
MainWindow w;
w.show();
return a.exec();
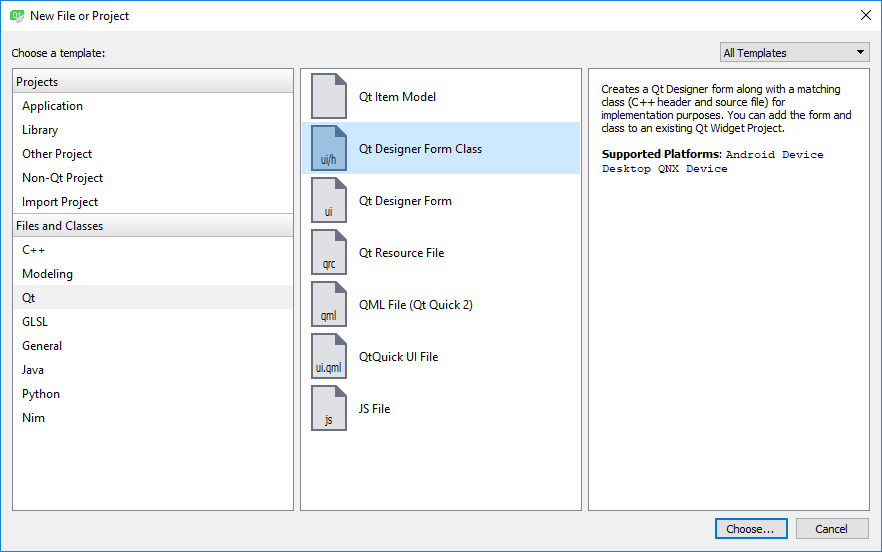
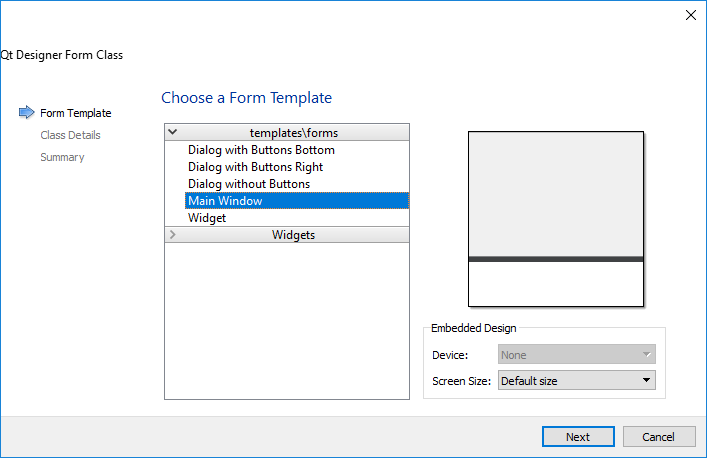
}Now, to add a Main Window to our application, select “New File or Project” from the “File” menu and then choose Qt Designer Form Class as seen below:
Make sure to choose “MainWindow” in the next screen, as seen here:
We’ll design a GUI similar to the following:
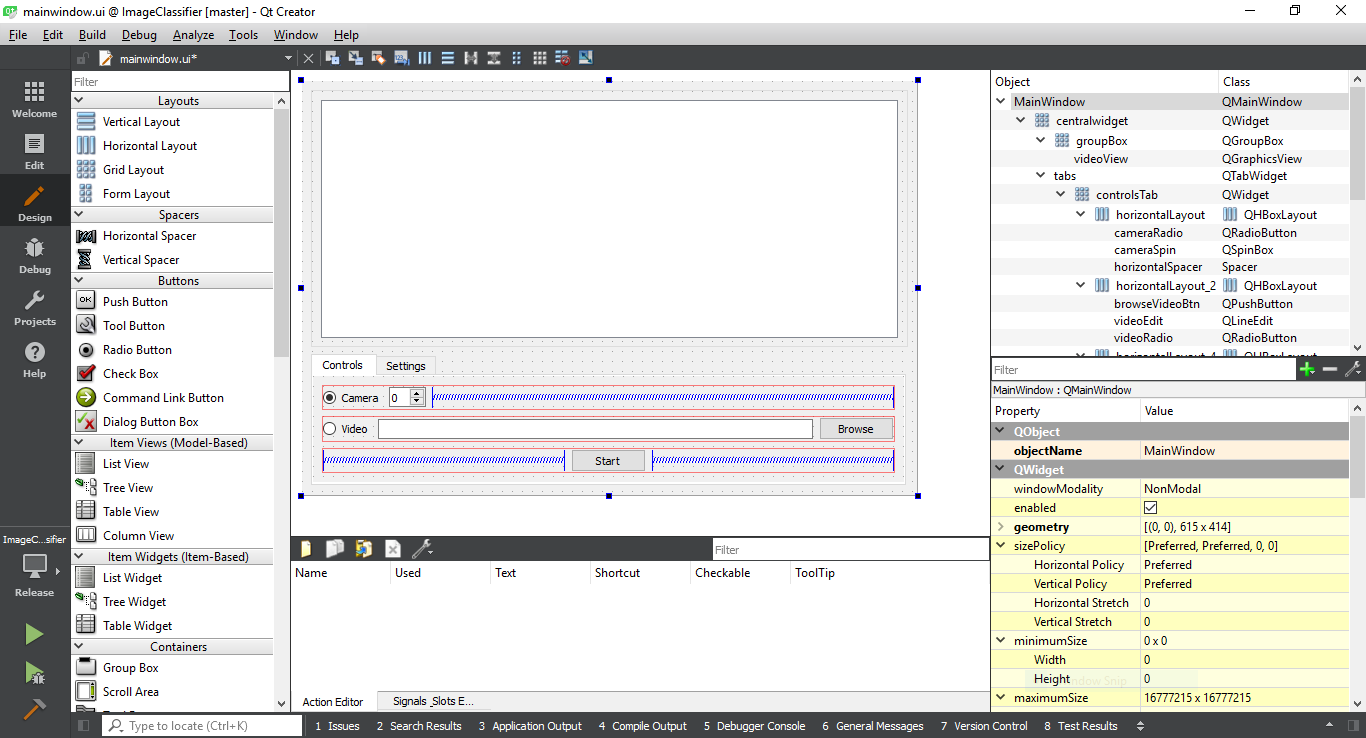
You can also get “mainwindow.ui” file from here:
http://amin-ahmadi.com/downloadfiles/qt-opencv-tensorflow/mainwindow.ui
In the “mainwindow.h” file, you need to start by adding the required includes, as seen here:
#include <QMainWindow>
#include <QMessageBox>
#include <QDebug>
#include <QFile>
#include <QElapsedTimer>
#include <QGraphicsScene>
#include <QGraphicsPixmapItem>
#include <QCloseEvent>
#include <QFileDialog>
#include <opencv2/opencv.hpp>
We will also need the following private members:
cv::dnn::Net tfNetwork;
QGraphicsScene scene;
QGraphicsPixmapItem pixmap;
bool videoStopped;
Where tfNetwork is the Deep Learning Network class in OpenCV, scene and pixmaps are used for displaying the output properly, and finally videoStopped is used as a flag to stop the video. We are going to keep things as simple as possible here.
You can download “mainwindow.h” file from here:
http://amin-ahmadi.com/downloadfiles/qt-opencv-tensorflow/mainwindow.h
“mainwindow.cpp” contains a number of methods to deal with the user interactions but the most important piece of code in it, is the part responsible for loading the TensorFlow model and configurations, and then performing detections. Here is how it is done. First of all, the pretrained model is loaded into the network (you’ll see how and where to get the models later on):
tfNetwork = readNetFromTensorflow(ui->pbFileEdit->text().toStdString(), ui->pbtxtFileEdit->text().toStdString());pbFileEdit and pbtxtFileEdit in this code are two Qt Line Edit widgets that hold the paths to the required files. The next step is loading a video or an existing camera on the computer. Using two radio buttons we can allow the users to switch between camera and video mode and then open the chosen one, here’s how:
VideoCapture video;
if (ui->cameraRadio->isChecked())
	video.open(ui->cameraSpin->value());
else
	video.open(ui->videoEdit->text().toStdString());
Where cameraRadio is a Radio Button, cameraSpin is a Spin Box and videoEdit is a Line Edit widget. Next thing we need to do is loop while reading video frames and processing them, until the video is ended or it is stopped. Here’s a simple solution for that:
Mat image;

while (!videoStopped && video.isOpened())
{
	video >> image;

	// Detect objects ...

	qApp->processEvents();
}
There are many different ways to achieve responsiveness in GUI when performing such tasks, and this is one of them. The more recommended way would be to move this part of the code into a QThread, but as it was mentioned before, we’ll keep things simple. The actual detection part is done as seen below.
First create a BLOB compatible with TensorFlow models:
Mat inputBlob = blobFromImage(image,
	inScaleFactor,
	Size(inWidth, inHeight),
	Scalar(meanVal, meanVal, meanVal),
	true,
	false);
The values provided to blobFromImage are defined as constants and must be provided by the network provider (see the references section at the bottom to peek into where they come from). Here’s what they are:
const int inWidth = 300;
const int inHeight = 300;
const float meanVal = 127.5; // 255 divided by 2
const float inScaleFactor = 1.0f / meanVal;
[Update April 04, 2019: You will only need inScaleFactor if you are using OpenCV 4.x and TensorFlow 2.0, pass it a value of 0.95]
To actually provide the blob to the network and get the detection results, do the following:
tfNetwork.setInput(inputBlob);
Mat result = tfNetwork.forward();
Mat detections(result.size[2], result.size[3], CV_32F, result.ptr<float>());
In the preceding code we simply set the input of the network to the prepared blob, then calculate the result of the network using the forward() method, and finally create a detections Mat class which has rows and columns equal to the third (height) and fourth (width) element of the Mat::size. See the following link, or the documentation for imagesFromBlob function if you feel lost:
https://docs.opencv.org/3.4.1/d6/d0f/group__dnn.html#ga4051b5fa2ed5f54b76c059a8625df9f5
The next part is extracting detections (based on an acceptable threshold), then getting the bounding boxes for objects, printing the name of the detected object class over it (from a previously loaded string of labels), and finally displaying it:
for (int i = 0; i < detections.rows; i++)
{
	float confidence = detections.at<float>(i, 2);

	if (confidence > confidenceThreshold)
	{
		using namespace cv;

		int objectClass = (int)(detections.at<float>(i, 1));

		int left = static_cast<int>(
			detections.at<float>(i, 3) * image.cols);
		int top = static_cast<int>(
			detections.at<float>(i, 4) * image.rows);
		int right = static_cast<int>(
			detections.at<float>(i, 5) * image.cols);
		int bottom = static_cast<int>(
			detections.at<float>(i, 6) * image.rows);

		rectangle(image, Point(left, top),
			Point(right, bottom), Scalar(0, 255, 0));
		String label = classNames[objectClass].toStdString();
		int baseLine = 0;
		Size labelSize = getTextSize(label, FONT_HERSHEY_SIMPLEX,
			0.5, 2, &baseLine);
		top = max(top, labelSize.height);
		rectangle(image, Point(left, top - labelSize.height),
			Point(left + labelSize.width, top + baseLine),
			Scalar(255, 255, 255), FILLED);
		putText(image, label, Point(left, top),
			FONT_HERSHEY_SIMPLEX, 0.5, Scalar(0, 0, 0));
	}
}

pixmap.setPixmap(
	QPixmap::fromImage(QImage(image.data,
		image.cols,
		image.rows,
		image.step,
		QImage::Format_RGB888).rgbSwapped()));
ui->videoView->fitInView(&pixmap, Qt::KeepAspectRatio);
You can download mainwindow.cpp file from here:
http://amin-ahmadi.com/downloadfiles/qt-opencv-tensorflow/mainwindow.cpp
Our application is more than ready! But we still need to get and prepare a TensorFlow network, so, let’s move on to the next section.
Getting and Preparing TensorFlow Model
First of all, start by downloading a pre-trained model from TensorFlow model zoo:
We will be using ssd_mobilenet_v1_coco which you can directly download from here:
http://download.tensorflow.org/models/object_detection/ssd_mobilenet_v1_coco_2017_11_17.tar.gz
[Update April 04, 2019: Or you can use a more recent version such as this one.]
Extract it to get ssd_mobilenet_v1_coco_2017_11_17 folder with the pre-trained files.
You need to get the text graph file for the model, one that is compatible with OpenCV. To do this you must use the following script:
opencv-source-files\samples\dnn\tf_text_graph_ssd.py
If you don’t have OpenCV source files (which would be quite strange at this point), you can get the script from here:
https://github.com/opencv/opencv/blob/master/samples/dnn/tf_text_graph_ssd.py
Just copy it to ssd_mobilenet_v1_coco_2017_11_17 folder and execute the following:
tf_text_graph_ssd.py --input frozen_inference_graph.pb --output frozen_inference_graph.pbtxtUpdate April 04, 2019: In more recent versions of OpenCV, you need to also copy tf_text_graph_common.py file, in addition to tf_text_graph_ssd.py, into the folder mentioned above and execute the following command:
tf_text_graph_ssd.py --input frozen_inference_graph.pb --output frozen_inference_graph.pbtxt --config pipeline.configClass names for this model can be found here:
This file won’t be of use for us the way it is, so here is a here’s a simpler (CSV) format that I’ve prepared to use to display class names when detecting them:
http://amin-ahmadi.com/downloadfiles/qt-opencv-tensorflow/class-names.txt
Now we have everything we need to run and test our classification app in action.
Running the Image Classifier Application
Run the application in Qt Creator and switch to the Settings tab at the bottom of the screen. You can choose the input files in this page, as seen in the screenshot:

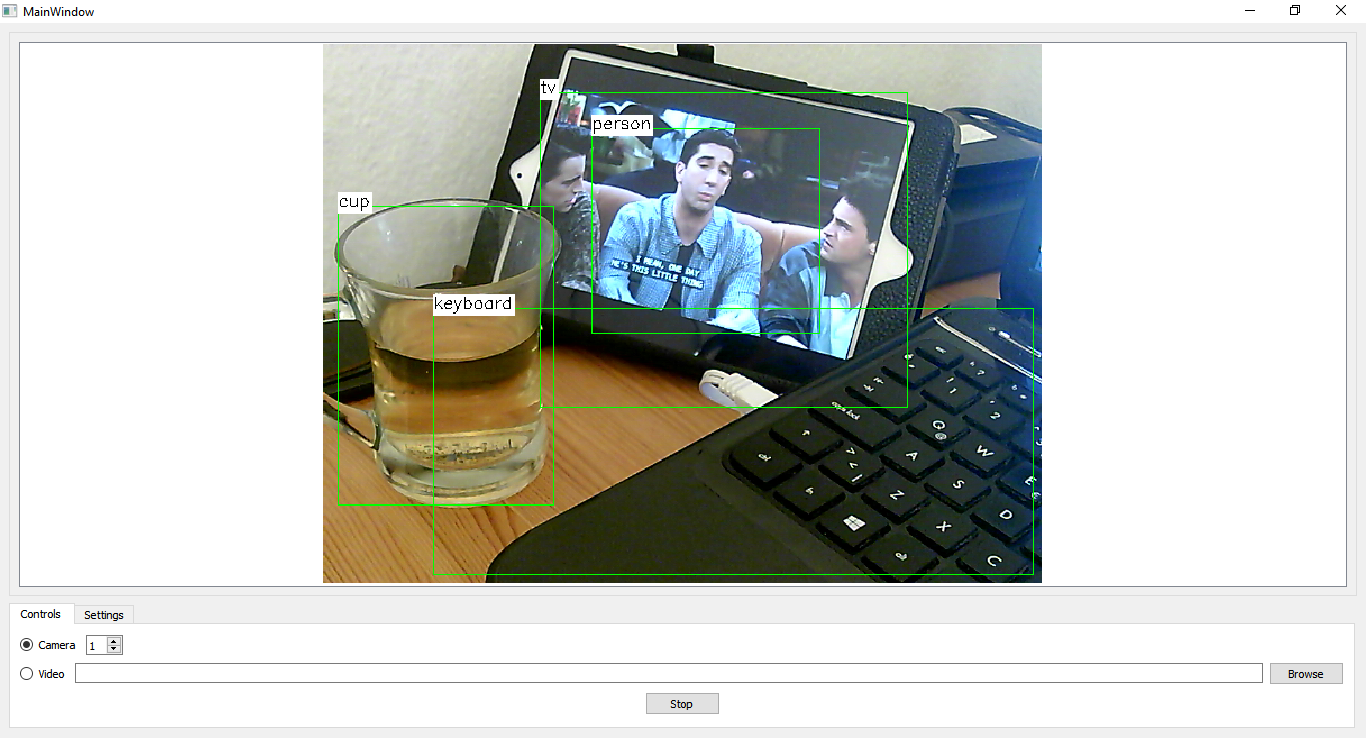
Now switch back to the Controls tab and hit the Start button. Try objects that exist in the class names list and see how the results are. Here’s what I got which is pretty good if we ignore the fact that my iPad is not exactly a TV:

Following pages, one way or another, helped me a lot while writing this guide:
https://github.com/opencv/opencv/tree/master/samples/dnn
https://www.tensorflow.org/tutorials/image_retraining
For more tutorials and a comprehensive guide to power-up your cross-platform and computer vision application development skills, you can also get my book, “Computer Vision with OpenCV 3 and Qt5“, from Amazon:
Hi Amin, you said that we can run the application in QT creator, but how exactly do i do it? When i click build or run cmake, nothing happened and i can’t run it.
Also during tf_text_graph_ssd.py –input frozen_inference_graph.pb –output frozen_inference_graph.pbtxt –config pipeline.config, i receive error message ModuleNotFoundError: No module named ‘tensorflow’
and
ModuleNotFoundError: No module named ‘cv2’ even though i have them installed
Well you’re obviously having environment issues. Are you able to build and run any apps using CMake in Qt Creator at all? What about running a simple Python script that uses OpenCV? First check if you can do these, if successful, you can retry this tutorial.
Hi Amin,
thank you for your tutorials, they helped me a lot. Keep up good work!
Now, if you don’t mind, I would like to also share some knowledge. You can add it to your tutorial if you want. This stuff is probably for more experienced programmers, so someone may not understand it.
I used OpenCV 4.1.0, Tensorflow 2.0 and QThread implementation of video detection. I searched for ways to accelerate the speed of CNN inference and found out that in OpenCV 4.0.0 the OpenCL acceleration of DNN module on AMD and NVIDIA GPUs was fixed (https://github.com/opencv/opencv/wiki/ChangeLog#version401).
The DNN module allows you to accelerate the CNN inference via OpenCL on GPUs. To do that you have to have OpenCL library and OpenCL compliant GPU. I’m not sure how OpenCL is set on your computer, but it works probably only with built OpenCV for your system. To find out if your library and system supports OpenCL you have to:
1. open Command line and navigate to: \Install\opencv\x64\vc15\bin
2. run: opencv_version –opencl
If you have OpenCL, the output will be someting like this:
4.1.0-dev[ INFO:0] global C:\openCV_library\opencv\modules\core\src\ocl.cpp (888) cv::ocl::haveOpenCL Initialize OpenCL runtime...
OpenCL Platforms:
Intel(R) OpenCL
iGPU: Intel(R) HD Graphics 530 (OpenCL 2.1 NEO )
CPU: Intel(R) Core(TM) i7-6700HQ CPU @ 2.60GHz (OpenCL 2.1 (Build 611))
NVIDIA CUDA
dGPU: GeForce GTX 960M (OpenCL 1.2 CUDA)
Current OpenCL device:
Type = dGPU
Name = GeForce GTX 960M
Version = OpenCL 1.2 CUDA
...
Of course the information will be filled according to your system. If you have NVIDIA GPU and want to use it, you have to install NVIDIA CUDA platform. I’m not sure if you also have to build OpenCV with CUDA (I have), maybe someone will find out. To change the default OpenCL device (GPUs and CPU) setting the OPENCV_OPENCL_DEVICE environmental variable is needed as described here: https://github.com/opencv/opencv/wiki/OpenCL-optimizations#opencv-opencl-configuration-options. You can set this variable for your project in your IDE (Visual Studio, Qt Creator) or as permanent in your system. In my case I used Visual Studio, but for unknown reasons setting the environmental variable for my Qt project didn’t work , so I needed to set permanent variable.
Now, all you need is to place this line before the code for detection:
tfNetwork.setPreferableTarget(DNN_TARGET_OPENCL);In general, the detection should be faster, but it may be even slower due the copying of frame to GPU. This should work on all models, but I tried only 2. The ssd_mobilenet_v1_ppn_shared_box_predictor_300x300_coco14_sync_2018_07_03 works on NVIDIA GPU, but since the model is very small, it’s also fast, so the process of copying to GPU makes the GPU variant slower. On my system the detection time for this model is around 300 ms on CPU and around 340 ms on GPU. Note that the time on your machine can be completely different due to hardware, system, different software, used model, etc. The second model ssd_mobilenet_v1_fpn_shared_box_predictor_640x640_coco14_sync_2018_07_03 works on Intel HD Graphics GPU, but unfortunately for to me unknown reasons crashes with NVIDIA GPU.
I hope this information will help someone. I recommend to read the documentation and search, if you didn’t understand something.
Kind regards,
Roman
Hi Roman,
Thanks for sharing this.
Hello Amin,
Thank you for this tutorial.
I am having one issue, after running the application the video starts, but, there is no classification. Can you please tell me what I have missed here?
Honestly, this can be due to many different reasons but to give you a starting point, have you tried lowering the threshold?
Amin,
Thanks for making this tutorial! I have a question regarding running this on an Ubuntu 16.04. I have everything installed and running, but am having a similar problem to Philippe. Its regarding the –config file being used for the training. I found this web page https://github.com/opencv/opencv/wiki/TensorFlow-Object-Detection-API , and its seems to have answered some of my questions, but would/could you recommend a config file?
Well, first of all, I’m going to refer you to the same answer I gave to Philippe.
Please make sure you’re using the same versions of all requirements mentioned here in this article.
And secondly, unfortunately it seems in newer versions of this script, there is a new mandatory config parameter and if you check the source codes of the Python file, it says “Path to a *.config file is used for training.”
Which basically means you need to provide the same config file used for the model you have obtained. I’ll try to write another tutorial when I get some free time for this but for now I suggest you look for the config file of the trained model and provide that as the –config parameter.
I hope this helps.
Hello, trying last step with:
D:\ssd_mobilenet_v1_coco_2017_11_17>tf_text_graph_ssd.py –input frozen_inference_graph.pb –output frozen_inference_graph.pbtxt
I receive error:
usage: tf_text_graph_ssd.py [-h] –input INPUT –output OUTPUT –config CONFIG
tf_text_graph_ssd.py: error: the following arguments are required: –config
Could you help me?
Can you check if you’re using the exact same versions of all requirements as the ones mentioned in the article, unfortunately all of the tools mentioned in this article have gone through significant updates and changes and you might need to do some tweaks if you’re planning on using this guide with more recent versions.
Are you doing this project on linux? I am and i was able to get the pbtxt file to generate through using those commands, but unfortunately the the image classifier is not working?
So Philippe just go to the link below and follow the steps and download a config file. Like I said I still dont have classifier working but it will be working soon… hopefully.
https://github.com/opencv/opencv/wiki/TensorFlow-Object-Detection-A
Amin do you have any ideas or suggestions why it may not be working?
Can you tell me exactly what you mean by “not working”?
Are you getting any outputs or no outputs at all?
Or do you mean the classifier doesn’t work as you expected?
Please try to give me more details and I’ll try to provide some ideas, if I can.
hi amin 🙂
i don’t get what to do in “Just copy it to ssd_mobilenet_v1_coco_2017_11_17 folder and execute the following” part,
can you explain more detail about this line?
As i understood, i tried in python power shell but it occurred syntax error and
also in cmd, it said configuration file is needed.
Hi Jessy,
First of all, I would really appreciate it if you send your questions just once. Sorry if I can’t reply immediately but you can be absolutely sure that I will answer them as best as I can and as soon as I can, so you don’t need to resend, just be a bit more patient 🙂
Back to your question, what is meant by that sentence, is that you need to copy the tf_text_graph_ssd.py file into the ssd_mobilenet_v1_coco_2017_11_17 folder, then open up a Command Prompt instance and “CD” (change directory) to the ssd_mobilenet_v1_coco_2017_11_17 folder and execute the command that is mentioned. Does that make sense? Let me know if it doesn’t help.
thank you!
i solved that problem, but i’m stuck with another problem,
you said
“Just copy it to ssd_mobilenet_v1_coco_2017_11_17 folder and execute the following:
tf_text_graph_ssd.py –input frozen_inference_graph.pb –output frozen_inference_graph.pbtxt”
but i don’t get what you say. as i understood, i put that line in the ‘tf_text_graph_ssd.py’ python shell, but it occurred syntax error.
can you explain more detail about this part?
sorry for bothering..
hi amin, thanks for your post.
i installed opencv and build it, but in this post you used ‘dnn’. so i tried to rebuild opencv with dnn, but i got so many errors, even i tried in various ways. can you teach me how to build opencv with dnn in qt?
Hi Jessy,
well, in more recent versions of OpenCV, DNN module has actually become a default module, which means you can use any of my tutorials for building and using OpenCV.
Here is one of the most recent tutorials:
http://amin-ahmadi.com/2018/10/29/a-simple-script-to-build-opencv-3-4-3-for-windows/
Hope it helps 🙂
thank you!!
i solve that problem, but i got other problem..
you said
“Just copy it to ssd_mobilenet_v1_coco_2017_11_17 folder and execute the following:”
i’m totally new in this part, i don’t get what you mean . as i understood, execute python file “tf_text_graph_ssd.py” and put “tf_text_graph_ssd.py –input frozen_inference_graph.pb –output frozen_inference_graph.pbtxt” in the python command shell. so i put this line and it occurred syntax error, and it said the format should be “–input INPUT –output OUTPUT –config CONFIG”, but in the line you showed, there is nothing about config. can you explain about “Just copy it to ssd_mobilenet_v1_coco_2017_11_17 folder and execute the following:” ?, sorry for bothering
thank you amin.
i solved the problem with upgrade my opencv version to 3.4.3.
thank you for your good tutarials.
Glad to hear you figured it out 🙂
Hello
I’m quite new to this dnn stuff but I was trying to follow your guide about creating this nice testing environment and I’m stuck with one problem. Build went ok, camera starts with [ INFO:0] VIDEOIO: Enabled backends(5, sorted by priority): FFMPEG(1000); MSMF(9
90); DSHOW(980); CV_IMAGES(970); CV_MJPEG(960)
[ WARN:0] terminating async callback
[ INFO:0] Initialize OpenCL runtime… but I’m not able to see the boxes indicating detection of any kind. The only thing which is different from prerequisites is openCV4.0. Could this be an issue? I also had warning during compilation likewarning: implicit conversion increases floating-point precision: ‘const float’ to ‘double’ (using msvc 2017 x64).Coud this be relevant ? Should I downgrade to wersion OpenCV 3.X? Is it hardware relevant? Windows 7 x64, 12gb RAM intel core i5vPro. Could someone help, provide hints?
Thanks in advance.
I would try with OpenCV 3.X first, there’s a good chance that it can cause issues (or differences from my tutorial) since DNN module is sort of new and still under heavy development. The same goes with TensorFlow. It is also being changed (updated and improved) quite a lot and the version used in this tutorial might not be fully compatible with the latest version. Nevertheless, it should be possible to modify what is mentioned here to fit it into newer versions. I’ll try to write a tutorial about it when I get a chance.
Hi Amin
Thank you for clarification . I already tried opencv 3.4.4. and it didn’t help. Face/cup not recognized (boxed). Maybe I will give a shot also to 3.4.1. (I wrote my post twice so ignore the next identical that I send by mistake).
Thank you for your help and very nice tutorial
Best Regards
Glad to be able to help.
Hi
Just small update. I was able to make it work with OpenCV 3.4.1 only.
Best Regards
Thanks for sharing this 🙂
I have the same probleme, it is due to high confidenceThreshold.
Try to set a lower value. You will see some boxes
Hello Amin.
thank you for your good tutarial.
I am using tensorflow object detection API to detect my costum object.
I retrained ssd_iception_coco_v1 on my dataset and saved check points and models with .pb extention.
then,I used tf_text_graph to make a model.pbtxt.
when i use frozen_inference_graph.pb and graph.pbtxt in opecv dnn module like your tutarial , appeares this message:
terminate called after throwing an instance of ‘cv::Exception’
what(): OpenCV(3.4.1-dev) /home/naser/opencv-3.4/modules/dnn/src/dnn.cpp:392: error: (-2:Unspecified error) Can’t create layer “Preprocessor/sub” of type “Sub” in function ‘getLayerInstance’
what is my wrong??
Well this tutorial is about using existing models and not custom objects trained by yourself, and the last time I checked, there were some issues preventing the usage of custom models out of the box. However, to point you in a reasonable direction, I would first try to see if my model works with TensorFlow detection examples, and then try to use it with OpenCV. Have you tried that?
Amin, thank you for this tutorial!
I just wanted to add that there is a folder with class labels are used in OpenCV samples,
https://github.com/opencv/opencv/tree/master/samples/data/dnn
Thanks for the link Dmitry 🙂
Hi Amin, thanks for your tutorials, it help me a lot. I bought your book Computer Vision with OpenCV 3 and Qt5 in Amazon, I’m waiting for it to arrive.
I have a question about “How to Create an Image Classifier Using Qt, OpenCV and TensorFlow”. I need the file labels.txt where there are class names, I cannot find it and I do not know how create it.
Thank you
Cesar
Hello! I solved it.
The labels.txt file looks as follows:
1,person
2,bicycle
3,car
4,motorcycle
5,airplane
6,bus
7,train
8,truck
9,boat
10,traffic light
11,fire hydrant
13,stop sign
14,parking meter
15,bench
16,bird
…
See https://github.com/tensorflow/models/blob/master/research/object_detection/data/mscoco_label_map.pbtxt for other class names.
Thanks
Cesar
You are absolutely right, although I fixed the link and you can now get the complete file.
Here is a copy:
http://amin-ahmadi.com/downloadfiles/qt-opencv-tensorflow/class-names.txt
Hi Cesar,
Sorry about it, somehow the link was missing. I just fixed it and here is is:
http://amin-ahmadi.com/downloadfiles/qt-opencv-tensorflow/class-names.txt