Utilizing the power of the GPU, and OpenGL in particular, for Computer Vision and Image Processing purposes has always been a favorite topic of mine. It’s quite easy to find many examples around (even among official Qt example projects) to deal with and learn more about this topic but I figured there are no clear and step by step examples for people who are absolutely new to it. This post aims to cover a number of topics, including the following, in a step by step and simple manner:
- How to use QOffscreenSurface class for off-screen rendering using OpenGL
- How to use QOpenGLFramebufferObject to create Frame Buffer objects
- How to use Vertex Shaders to perform Geometric Image Transformations
- How to use Fragment Shaders to perform Image Filtering and per-pixel operations
- How to convert a texture to QImage
We’re going to create a function with a very straightforward signature. It takes a QImage and after processing it using both shader programs, returns a QImage. Simple! But we need to pass the shader source codes and a few other parameters as well (all related to the shaders). Here it is:
QImage processImage(const QImage& image,
                    const QString& vertexShader,
                    const QString& fragmentShader,
                    const QString& textureVar,
                    const QString& vertexPosVar,
                    const QString& textureCoordVar);
Assuming the bare minimum shaders, that perform nothing but just passing the QImage through the code without modifying it, here is an example of how we’re going to use this function in our code:
QString vertexShader =
        "attribute vec4 aPosition;\n"
        "attribute vec2 aTexCoord;\n"
        "varying vec2 vTexCoord;\n"
        "void main()\n"
        "{\n"
        "   gl_Position = aPosition;\n"
        "   vTexCoord = aTexCoord;\n"
        "}";

QString fragmentShader =
        "uniform sampler2D texture;\n"
        "varying vec2 vTexCoord;\n"
        "void main()\n"
        "{\n"
        "   gl_FragColor = texture2D(texture, vTexCoord);\n"
        "}";

QImage image = processImage(QImage("C:/test.png"),
                            vertexShader,
                            fragmentShader,
                            "texture",
                            "aPosition",
                            "aTexCoord");
Notice how texture, aPosition and aTexCoord labels that exist in our shader source codes are passed into the processImage function as well.
Now to the real implementation of our processImage function. Follow the 10 steps below:
Step 1: Create an OpenGL context to work with.
QOpenGLContext context;
if(!context.create())
{
    qDebug() << "Can't create GL context.";
    return {};
}
Step 2: Create the offscreen surface to use for rendering on.
QOffscreenSurface surface;
surface.setFormat(context.format());
surface.create();
if(!surface.isValid())
{
    qDebug() << "Surface not valid.";
    return {};
}
Step 3: Make the context “current” for the surface. Consider this as binding the context and surface together.
if(!context.makeCurrent(&surface))
{
    qDebug() << "Can't make context current.";
    return {};
}
Step 4: Create a Frame Buffer Object the same size of the input image. Set the viewport accordingly.
QOpenGLFramebufferObject fbo(image.size());
context.functions()->glViewport(0, 0, image.width(), image.height());
Step 5: Time to compile, link and bind Vertex and Fragment shader source codes.
QOpenGLShaderProgram program(&context);
if (!program.addShaderFromSourceCode(QOpenGLShader::Vertex, vertexShader))
{
    qDebug() << "Can't add vertex shader.";
    return {};
}
if (!program.addShaderFromSourceCode(QOpenGLShader::Fragment, fragmentShader))
{
    qDebug() << "Can't add fragment shader.";
    return {};
}
if (!program.link())
{
    qDebug() << "Can't link program.";
    return {};
}
if (!program.bind())
{
    qDebug() << "Can't bind program.";
    return {};
}
Step 6: Now we create an OpenGL texture and bind it accordingly.
QOpenGLTexture texture(QOpenGLTexture::Target2D);
texture.setData(image);

texture.bind();
if(!texture.isBound())
{
    qDebug() << "Texture not bound.";
    return {};
}
Step 7: Next, we create the vertex and index data before we bind them as necessary.
struct VertexData
{
    QVector2D position;
    QVector2D texCoord;
};

VertexData vertices[] =
{
    {{ -1.0f, +1.0f }, { 0.0f, 1.0f }}, // top-left
    {{ +1.0f, +1.0f }, { 1.0f, 1.0f }}, // top-right
    {{ -1.0f, -1.0f }, { 0.0f, 0.0f }}, // bottom-left
    {{ +1.0f, -1.0f }, { 1.0f, 0.0f }}  // bottom-right
};

GLuint indices[] =
{
    0, 1, 2, 3
};

QOpenGLBuffer vertexBuf(QOpenGLBuffer::VertexBuffer);
QOpenGLBuffer indexBuf(QOpenGLBuffer::IndexBuffer);

if(!vertexBuf.create())
{
    qDebug() << "Can't create vertex buffer.";
    return {};
}

if(!indexBuf.create())
{
    qDebug() << "Can't create index buffer.";
    return {};
}

if(!vertexBuf.bind())
{
    qDebug() << "Can't bind vertex buffer.";
    return {};
}
vertexBuf.allocate(vertices, 4 * sizeof(VertexData));

if(!indexBuf.bind())
{
    qDebug() << "Can't bind index buffer.";
    return {};
}
indexBuf.allocate(indices, 4 * sizeof(GLuint));
Step 8: We need to set the attribute and uniform values before actually proceeding with the drawing. This is the part where each buffer or texture is actually set to a variable in the vertex or fragment shader code.
int offset = 0;
program.enableAttributeArray(vertexPosVar.toLatin1().data());
program.setAttributeBuffer(vertexPosVar.toLatin1().data(), GL_FLOAT, offset, 2, sizeof(VertexData));
offset += sizeof(QVector2D);
program.enableAttributeArray(textureCoordVar.toLatin1().data());
program.setAttributeBuffer(textureCoordVar.toLatin1().data(), GL_FLOAT, offset, 2, sizeof(VertexData));
program.setUniformValue(textureVar.toLatin1().data(), 0);
Step 9: Now we draw. Using GL_TRIANGLE_STRIP offers a bit of cross-platform confidence since it exists almost everywhere. But you can definitely use GL_TRIANGLES, GL_QUADS and so on. Just be sure to adjust the vertices and indices accordingly if you opt not use GL_TRIANGLE_STRIP for whatever reason.
context.functions()->glDrawElements(GL_TRIANGLE_STRIP, 4, GL_UNSIGNED_INT, Q_NULLPTR);Step 10: The last step is to simply create a QImage from the FBO.
return fbo.toImage(false);Just merge all the codes in all of the steps and you have the full processImage function with the signature mentioned in the beginning of this tutorial.
Now you can modify the shader source codes to end up performing geometric transformations or per-pixel operations. For instance, you can use the following Vertex shader source code to flip the image around the x axis:
QString vertexShader =
        "attribute vec4 aPosition;\n"
        "attribute vec2 aTexCoord;\n"
        "varying vec2 vTexCoord;\n"
        "void main()\n"
        "{\n"
        "   gl_Position = aPosition;\n"
        "   vTexCoord.x = -aTexCoord.x;\n"
        "   vTexCoord.y = aTexCoord.y;\n"
        "}";
Just use your imagination and you can end up performing fantastic transformations, like perspective transformation, warping, remapping and so on, all using the skills you learned in this tutorial.
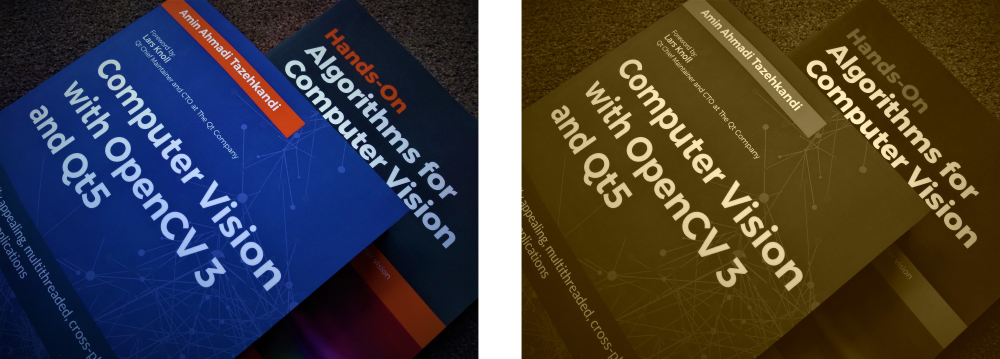
Here is another example of using a Fragment shader to apply Sepia effect to an image:
QString fragmentShader =
        "uniform sampler2D texture;\n"
        "varying vec2 vTexCoord;\n"
        "void main()\n"
        "{\n"
        "   vec2 uv = vTexCoord;\n"
        "   vec4 orig = texture2D(texture, uv);\n"
        "   vec3 col = orig.rgb;\n"
        "   float y = 0.3 * col.r + 0.59 * col.g + 0.11 * col.b;\n"
        "   gl_FragColor = vec4(y + 0.15, y + 0.07, y - 0.12, 1.0);\n"
        "}";
Here is an image depicting the input and output images when the preceding Fragment shader is used:
The source codes shared here can be used as they are in most mobile and desktop platforms alike, since it relies on OpenGL ES which is the most widely used cross-platform implementation of OpenGL.
Awesome thanks!
Is there a git/source I could download?
TIA
You’ll have to put the code together yourself. All that’s necessary is shared though.